Fun Watercolor Techniques to Try Today
Back in high school, I remember sitting in art class and being SO FRUSTRATED with the watercoloring section of the semester.
I thought my watercolor drawings absolute worst. I’d look over and see other students just “getting it” and meanwhile I was over in struggle-town. Been there?
After lots of trial and error, I learned a few things along the way that I wish someone would have taught me right from the get-go.
If you’re new to watercoloring or just want to take a step back to the basics, here are 11 watercolor exercises that are great for beginners (and pros!).
These exercises will teach you how to control watercolor and learn why things can go wrong. From creating swatches of perfectly smooth color to mastering the gradient (hello, sunset drawings!), you’ll get the hang of it in no time!
Getting Set Up
For this exercise, I used one sheet of 9x12 watercolor paper divided into 3 squares by 4 squares. Yep, there are 11 exercises but you’ll end up with 12 squares - we all need that extra one for the oops moment!
I cut mine up but you can leave them all on the same sheet. Just be sure to leave white space around each watercolor swatch - we don’t want them bleeding into one another (more on that in an exercise below!)!
If you don’t have materials yet, you can check out my list of favorite supplies here!
Flat Wash
A flat wash is where you are trying to achieve a solid, smooth swatch of one color on your paper.
If you’ve ever tried to do a flat wash before, you might have run into uneven color or “splotches”.
So, why do splotches happen?
Usually it’s a case of the watercolor drying before you finish coloring the entire area. When watercolors dry, they can leave a hard edge that can be hard to smooth out later.
Another reason that splotches happen is that you change the ratio of water to watercolor as you’re coloring.
The way to achieve a smooth swatch of color is to keep the exact same ratio of water to watercolor and never let a portion of the swatch dry before you finish.
Here are two techniques that will help you achieve that smooth color!
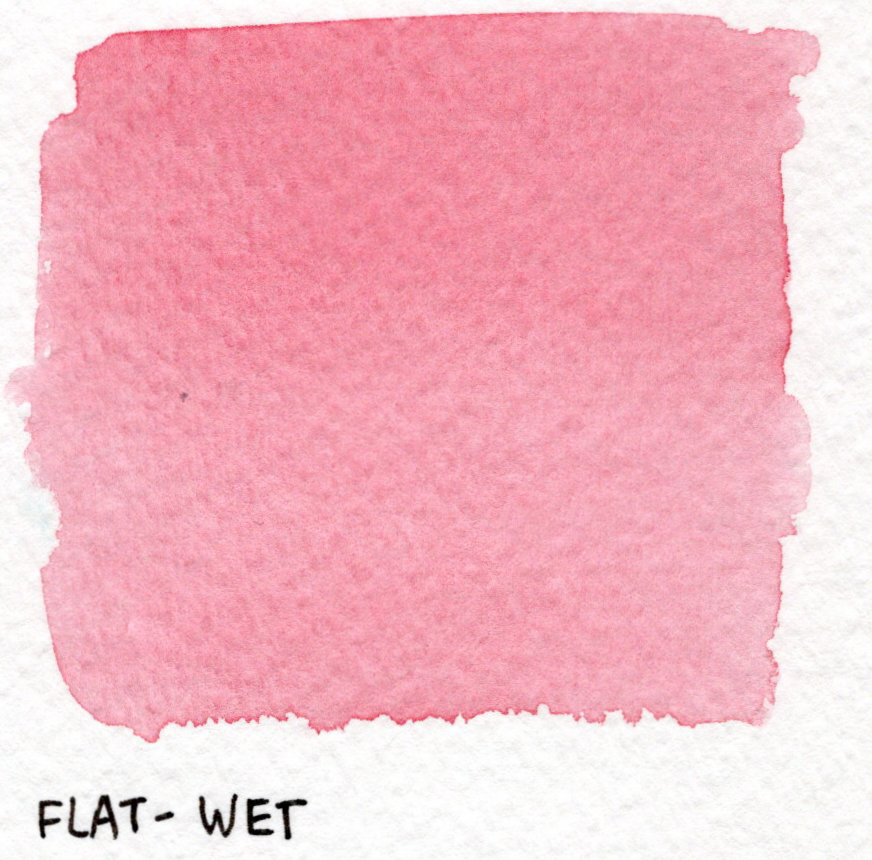
Flat Wash - Wet
The “wet” flat wash is great for large areas of solid, smooth color.
The flat wash “wet” technique is where you wet the area of your paper with water FIRST and then apply color to the wet area.
When you’re trying to color in a large area, it can be hard to do the entire section without one portion drying first. By wetting the paper with water first, you’re giving yourself more time to finish the swatch!
Here’s how to do a flat wash with the wet technique:
- Wet the entire area you want to paint using just your wet brush (no color yet!). Make sure the water is even across the paper - we don’t want a puddle on one end and barely damp on the other end! The paper should look slightly shiny when you’re done. To check, you can hold up the paper and tilt it around to see the shine.
- Grab some of your color onto your brush and mix it with a tiny bit of water in your pallet. Make sure to mix enough to apply to the entire area. I use about 80% color, 20% water as there’s already water on the paper.
- Once you have enough color mixed, begin to apply it starting at the top of your paper, working your way down with strokes running the same direction.
- Don’t overwork it! The first pass is usually the best one.
Dos
- Make sure the water is spread evenly over your paper.
- Use same-directional strokes to apply the color
Avoid
- Taking color directly from your watercolor pan to your paper. It won’t be desaturated enough to match what you’ve already mixed.
- Dipping your brush back in the water cup. This will dilute your color and make the swatch uneven
- Overworking it. Less is more here!

Flat Wash - Dry
For the flat wash “dry” technique, we are going to put the color straight onto the dry paper.
I like this technique for smaller portions of a drawing! There’s less of a chance of the edge drying before you can fill in the entire swatch.
I’m also a fan of this dry flat wash because I can accurately predict the final color - there’s no water on the paper to dilute my pre-mixed color.
How to do the flat wash dry technique:
- First, wet your brush and dive into the watercolor paint.
- Now that your brush is saturated with paint, smudge it around in your palette. You can grab more water and paint and mix it up until you have a puddle of color large enough to cover your paper. I’m using about 75% watercolor paint to 25% water ratio in this example!
- Starting at the top of your paper, brush your color onto the paper using even side-to-side strokes. The more even pressured your strokes are, the more smooth the color will be!
- Grab more paint as you need it.
- Be careful not to mess with the already-applied paint too much. Some portions might already be drying. The less you mess with it, the better!
Dos
- Apply even pressure
- Use the same water-to-watercolor ratio on your entire swatch
- Apply the color using strokes in the same direction
Avoid
- Taking color directly from your watercolor pan to your paper. It won’t be desaturated enough to match what you’ve already mixed.
- Letting the edges dry. Once the edge of a watercolor stroke has dried on the page, it’s hard to make the line go away. Work fast so nothing dries!
Wet on Wet
The “wet on wet” technique means that you’re applying watercolor on top of a still wet watercolor.
This method is absolutely unique to watercoloring! It can be used to create blurry fields of flowers, cloudy skies, or sunsets like a champ.
When used intentionally, it can be crazy-good.
It can also be frustrating if you weren’t intending to use the wet-on-wet technique.
For example...have you ever had two colors on your paper start to bleed into each other? *raises hand*
Because water flows freely, when a color isn’t dry and you apply another wet color right up next to it, the water from one color will flow/bleed into the other.
Here’s how to do the wet on wet technique with intention:

Wet on Wet - Wet
Wet on wet on...wet? Yes! This is when you intentionally apply another watercolor on top of a wet watercolor already on the page.
This wet on wet technique starts the same way as the flat wash “wet” technique.
- Wet your paper with water.
- Apply your first color all over the wet area.
- Clean your brush, and grab a second color.
- Apply the second color right on top of the first color while the first is still wet.
- Watch the second color bleed out into the first color!
You can even go back in and add splotches of the first color.
For this technique, make sure all the colors at least stay somewhat damp while you’re working.
There’s also no rule for keeping the same ratio of water to watercolor on this technique. Play around by using more water in some areas, less in others!
The more you experiment, the better you’ll understand why certain things happen when you sit down to create a painting!

Wet on Wet - Dry
For this technique, we are going to intentionally let colors bleed into one another!
The wet on wet dry paper technique is where we will apply watercolors directly onto dry paper.
When we paint with the second color, we will paint it directly adjacent to the first color - letting them touch.
When the colors touch, they will bleed into one another!
Let’s do the wet on wet technique with dry paper:
- Mix some of your first watercolor with water in your palette.
- Apply the first color in blobs or random shapes on your paper.
- Clean your brush in your water cup and mix the second color with water in your palette.
- Apply the second color in blobs or random shapes directly next to the blobs of the first color.
Things to try:
- Apply the first or second color over an already-colored part of paper
- Grab color directly from your watercolor pan, skipping mixing in the palette, and dab it into a wet puddle of color on the paper.
- Grab plain water and put a drop onto colored portions of paper.
See what happens! It’s fun to experiment with wet on wet techniques as you can’t get this effect with any other art medium!
Gradient

Gradient - wet
For the gradient “wet” technique, we will use the water on our paper to dilute the color!
When you start, your watercolor brush will be saturated with color. As you move down the wet paper, the color will gradually dilute itself.
Let’s create a gradient with the wet technique:
- Apply an even coat of water to your paper.
- Mix up an 80/20 mix of color to water ratio in your palette. Feel free to even mix it a bit stronger at 90/10 as there’s already water on the paper.
- Starting at the top (or the spot on the paper where you want the darkest color to be), work with even, light strokes from left to right. As you move down the paper, the color will gradually fade.
- If you’re seeing that the color isn’t fading enough, dip your brush into the water cup and tap it on the side. Some color will still be in your brush - you just added some water to it!
- You can go back to the top of the paper and add color directly from you watercolor pan to the paper if it needs to be darker.
- Blend the color down with smooth, even strokes.
If you end up with a puddle of concentrated color (like I did in the video), you can dry off your brush on a paper town and then place your brush on the puddle.
The dry brush acts like a thirsty sponge that will soak up any excess water or color!
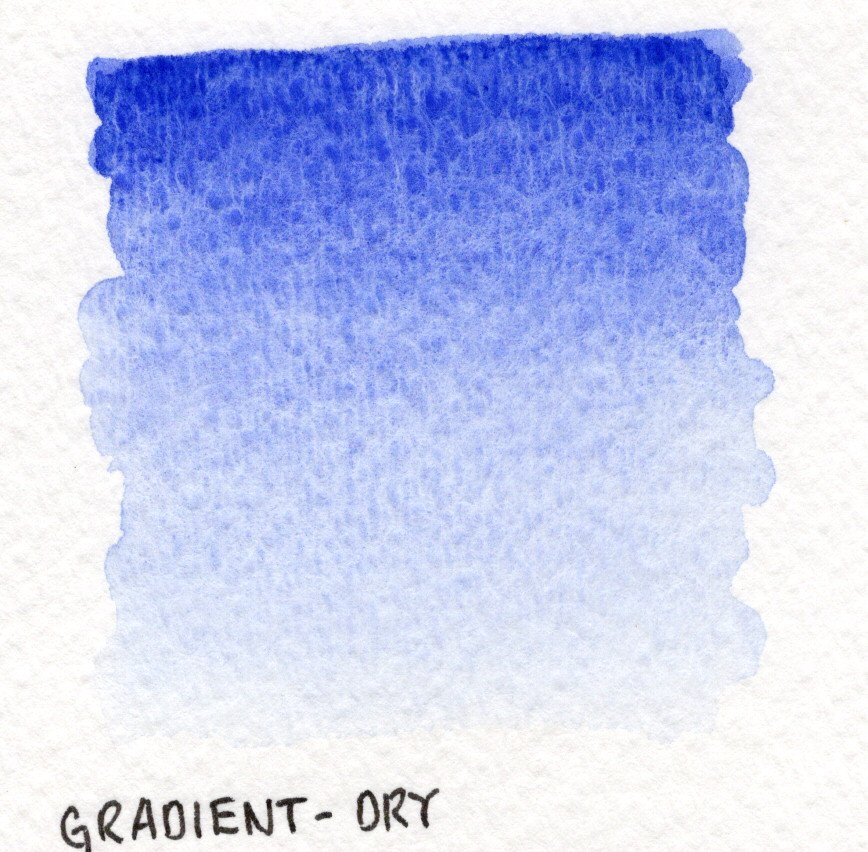
Gradient - dry
The dry gradient technique is one I use for smaller areas of gradient. When you’ve got a smaller area that you need to be gradient (like a small ball in your drawing) it’s best to use the dry gradient technique. I’ve found that if there’s too much water in a small area, it’s hard to control the color fade!
Here’s my process to create a dry gradient:
- Mix up about 80% color to 20% water in your palette.
- Starting at the top of your paper, apply the color in side-to-side strokes.
- Once you’re about a third of the way down, dip your brush into your water cup. Don’t squeeze out any of the color just yet!
- Now that your brush holds a bit more water, drag the color from the first third of the paper into your middle third of the paper.
- For the last third, clean your brush off entirely and have it just be filled with water. Apply water to the lower third of your paper.
- Now that your paper is all wet, you can blend them together.
Feel free to add a little more color to the top of the gradient.
You can also mix more water into the color on your palette if you need to dilute it a bit.
While this technique is a little more difficult, it can be useful for smaller areas of gradient!
Try it out a few times to get the feel for it. Half of this battle is understanding how much water your brush can hold and how much pressure you need to apply to get the water out.
Once you get the hang of your brush, watercoloring will feel more natural!
Glazing
Glazing is the process of layering colors on top of each other AFTER they are dry.
Watercolors are naturally transparent so think of glazing as layering colored glass sheets on top of one another.
You can layer two different colors on top of each other to create a whole new color.
Some watercolors are naturally more transparent than others. Usually, yellows are SUPER transparent while some dark blues and barely transparent.
I’ll say it again, and again - experiment with your watercolors! You won’t know what the colors do until you try it out.
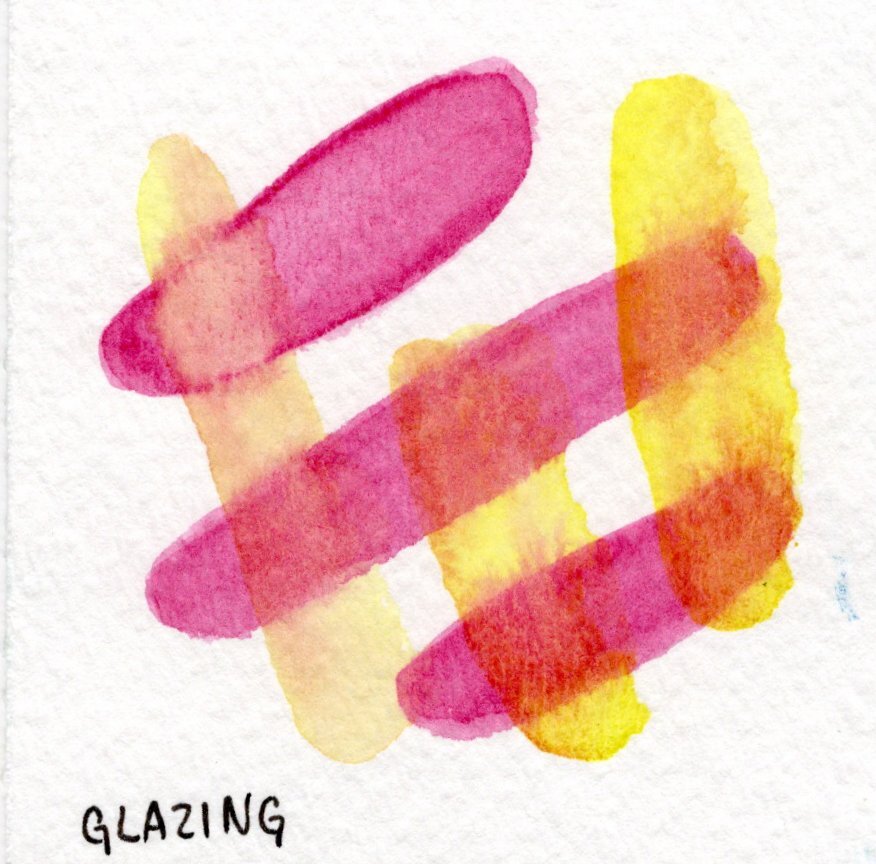
Glazing - Two Colors
How to do a glazing technique (and how it can go wrong):
- Mix a 80/20 color to water ratio in your palette.
- Apply color to you paper in blobs, stripes, or one big square - up to you! I did squiggly stripes for my example.
- The most important part: WAIT FOR IT TO DRY. If you’re as impatient as I am, this can be the hardest part of watercoloring. As a pro tip, you can use a hairdryer to super-speed up the process.
- Mix the second color in your palette. I’m using yellow to show you it’s transparency!
- Apply the yellow color over the first color. I’m running yellow stripes perpendicular to the first color so I can see the differences.
My first stripe of color wasn’t quite dry enough before I layered on the yellow stripes. When you don’t wait long enough, the first color can bleed into the second (like the wet on wet, dry paper technique).
The second two stripes were better as they dried completely!
Play around with different color combos - just make sure it’s dry before you keep layering!
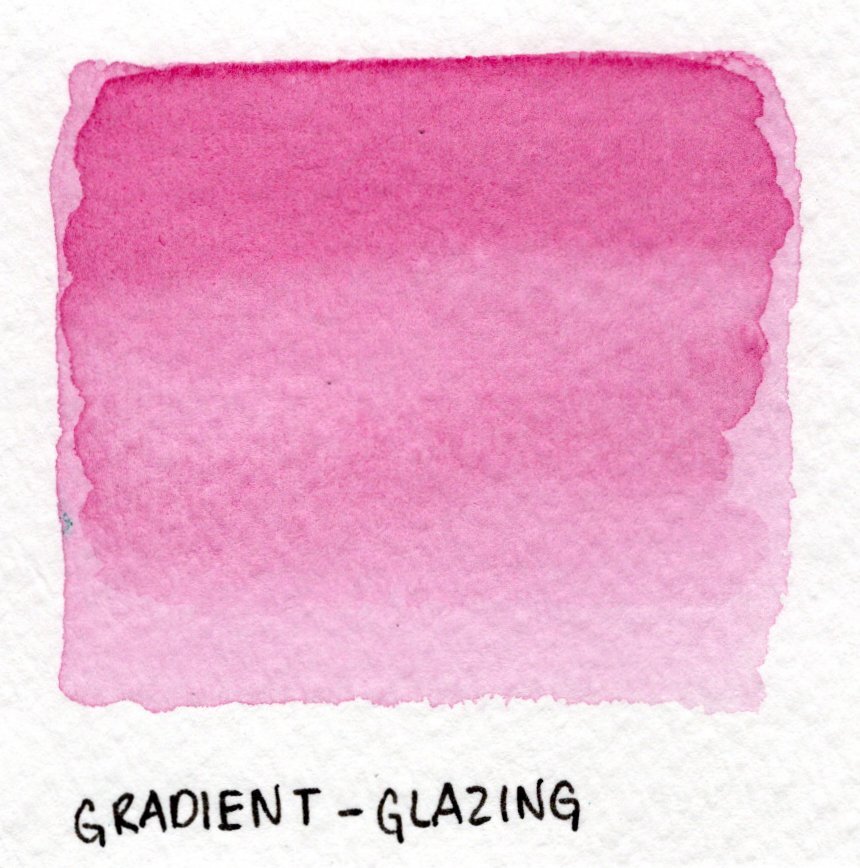
Glazing - Gradient
Similar to the two color glazing technique above, you can use glazing to darken a color on a page.
If you noticed that a color isn’t dark enough after it’s dried, you can always go back and “glaze” the same (or another color) on top of it!
Here’s a glazing gradient example using the same color:
Two Colors
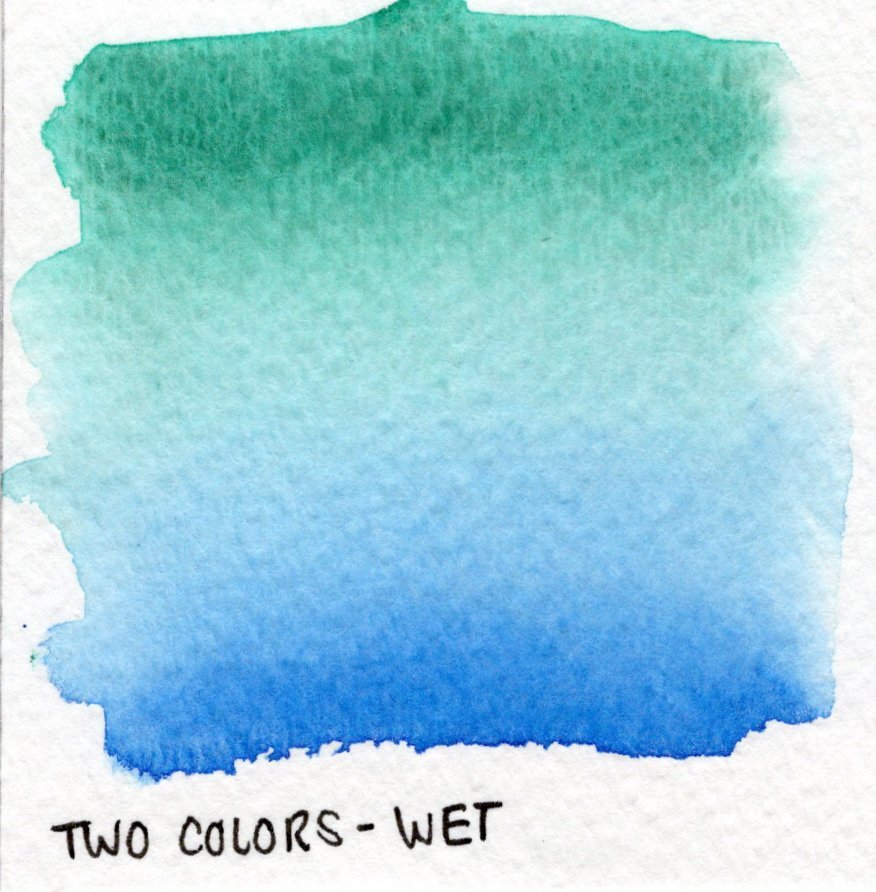
Two Colors - wet
To smoothly blend two colors together, I like to use the “two colors - wet” technique. When the paper is already wet, it’s easy to blend the colors together right on the paper.
Use this technique when you have a large area of two colors blending together.
Let’s do the two colors, wet paper method:
- Wet your entire swatch with an even coat of water. You can tilt it to see the shine and see if you missed any spots.
- Similar to the gradient wet technique, start by applying the first color with strokes in the same side to side direction, working down the paper.
- Once you’ve got the first color into a gradient, it’s time to add the second color.
- Starting from the bottom side this time, do a gradient in the opposite direction (working up the paper).
- You can add more of either color to saturate the effect. Just keep blending up and down the paper until it looks right!
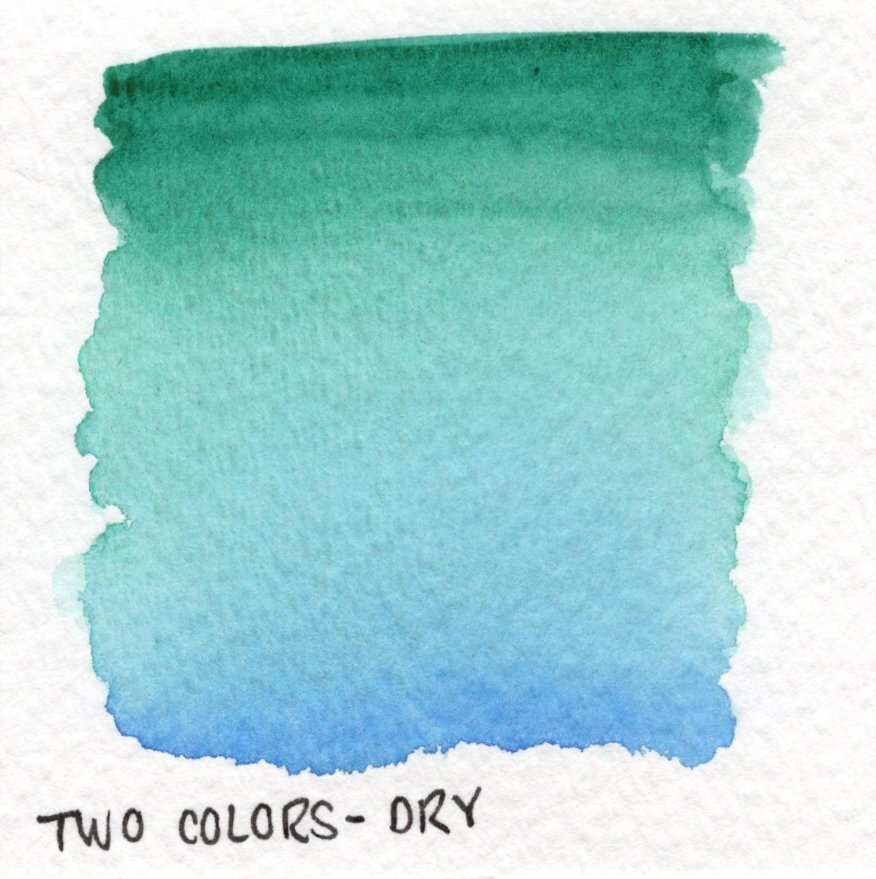
Two Colors - dry
When you want to blend two colors together in a small portion of your drawing, it’s best to use the “dry” technique...meaning, your paper isn’t already wet when you apply color.
How to do a mixing of two colors, dry technique:
- Mix one 80/20 mixture of color to water in your palette.
- Use the same technique as the “gradient - dry” method listed above for your first color.
- For the second color, start from the bottom and work your way up.
- Optional: you can mix the two colors together in your palette and apply the mixed color to the middle of your swatch.

Gradient - White
This method is exactly the same as the “Two Colors - Dry” method...only this time, you’re using white as the second color!
Remember, the only way to get a true white with watercolors is to let the white of the paper shine through.
The white watercolor in your box can be used to make any color more of a “pastel’.
So, we will be doing a gradient from the saturated color to a more “pastel” version of the same color.
With these 11 exercises, you’ll be able to experiment and determine what works best for you!
Me? I’m more of a dry technique kinda gal as my drawings are usually on the smaller side.
What works best for you? Or, which technique was the most fun? Let me know!
12 comments
I’ve made a major move across the states from California to the Carolinas and all of my paints are still tied up in storage and I’m having oil painters withdrawals. I’m looking forward to experimenting with watercolor. I’ve watched your tutorials and I’m anxious to get started using your techniques.
I’ve made a major move across the states from California to the Carolinas and all of my paints are still tied up in storage and I’m having oil painters withdrawals. I’m looking forward to experimenting with watercolor. I’ve watched your tutorials and I’m anxious to get started using your techniques.
Thanks for the tutorial. I’m a acrylic/oil painter. I don’t do much in oil, I just dabble. I thought doing watercolors would be easy, since I have previous painting experience. I was soooo wrong, I am frustrated that my watercolor paints don’t go where I tell them. I am hoping doing these tutorials will help me succumb to the watercolors. I don’t know what you have in store for us. Looking forward
Thank you so much for this! I have 3 different qualities of paper, it will be very interesting to see what happens
Thanks you so much, Katie! I really enjoyed your exercises which I’ve found accurate and clear. I have fun with the wet on wet techniques because you can’t control everything… it’s magical